What an amazing day. At MEM in the NEC all day. 8 hours of driving, audio, dome, dome servos, lights and LOTs of showing off, and the batteries are still about half charge, so it looks like when the novelty wears off a little the power will be enough for a full event.
A few tweaks needed. First off the Lipo setting on the Sabertooth caused it to error a lot, but flipping that dip switch solved the drive issues. Secondly, the 2-3-2 isnt happy, not sure if the position of the legs is exactly right and think that the leg travel might be a few mm too short, but he was looking like he wanted to face plant. :( Might have a go at tweaking that tomorrow and try again. The lights stopped working on a couple of occasions, but only after an hour or more of playing, so not too worried there. But i was thrilled he lasted the day, and i am eager to return for more tomorrow.
I loved the reaction of the kids, one was waving at R2, so R2 waved back, the kid grabbed his mum's phone, and instead of taking a pic of R2, he ran over to R2, loaded up a pic and showed it to R2, then ran back and grabbed his toy to show him too. He was chatting away to him quite happily. So cute. :)
But R2 got a great reaction, i am one proud builder tonight. :) Fingers crossed for a trouble free day tomorrow. :)

Saturday, 24 November 2012
Tuesday, 20 November 2012
Everything works together, even 2-3-2
A good long weekend of building. I went over the whole droid and tightened every nut and bolt, and basically rebuilt him. The bricks on the test run had really had an effect.
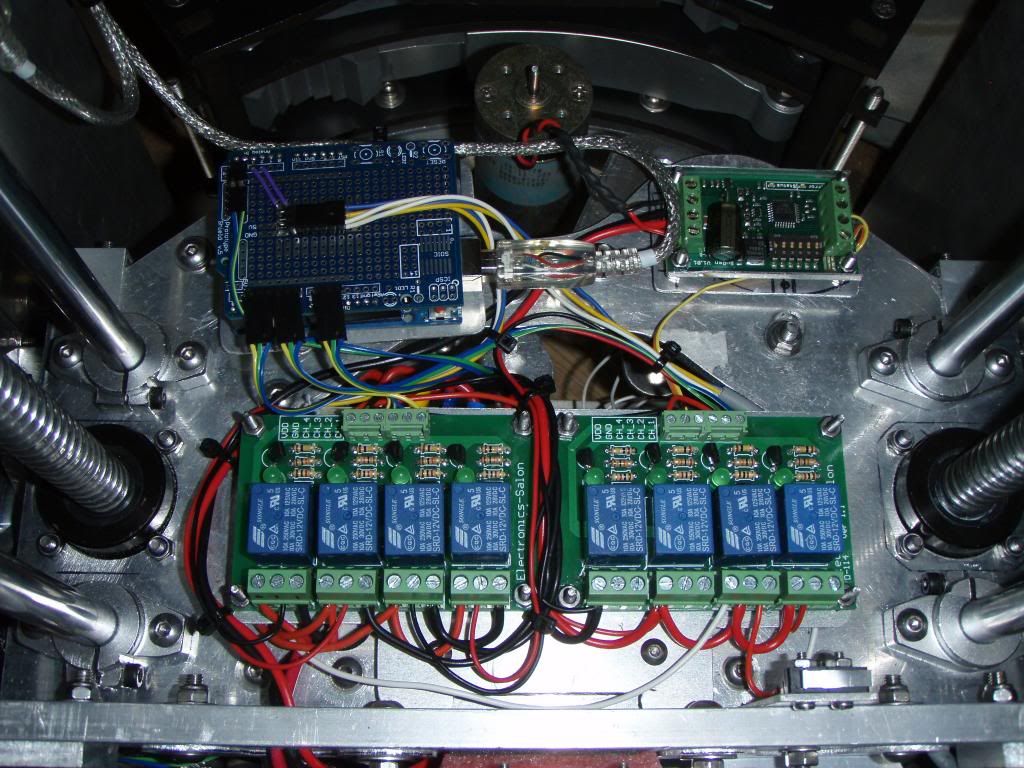
I wired the Sabretooth and Master Arduino flat instead of vertical, and added the slip ring connector to the back of the rig runner using a velcro pad. So its all in and looking like its going to work. :)

Then i added the 5V 12AH USB Powerbank to power the master, MP3 and 2-3-2 Arduinos. It worked great. So i added the other one in the dome to power the Teeces and the Dome servo Arduino (but not the servos). I hope this will add to the life of my droid significantly, its like adding 10Ah at 12v and should run that stuff for days at a time. 9 hours today in the dome running both and it still says full power. :) All that drive testing and 2-3-2 testing today all weekend and the main battery still says its full too! :D I might get a decent amount of driving in assuming it doesn't fail.


I then got the 2-3-2 working, i spent several hours debugging the set-up only to find the problem was a squashed wire caught under a washer. With that done i had basically played with and re wired everything, so it over ran and blew fuses on the actuators first try, then i reversed the polarity in the code and ran it again, and i had the left/right the wrong way round on the pots, so replaced the fuses again, sorted the code and it ran like a dream. I then removed and straightened the brackets and popped them back. :)
The rods studs make a big difference, and with a few tweaks it will be great. But it works fine for now, i will tweak and redo the actuator mounts after the NEC. Thanks again for those James, really cool. :)
So for the NEC we have the pad running this lot, i just need to learn the commands now. :)
1. Teeces triggered
2. Dome servos, 9 doors, 3 HPs
3. MP3 Control
4. Dome Drive
5. Dome Drive Position Controller
6. Feet Drive
7. 2-3-2 plus wobble and walk (no feet drive motion)

I have a plan to try and get the pad looked at soon, but i taped it up for now, it looks so much better, but still crashes, but nothing happened when the pad crashed, so that is good news. I think the next big priority is to adjust the drive settings when in 2 leg mode, he drives fine in 2 leg but i need to lower the acceleration and the top speed and help stop the desire to flip. But he seems relatively stable, he span on the spot ok and driving very gently it seemed fine.
So my droid was sorted pretty early today, but James was here so we had a look at getting his droid working via a pad, I will let him fill you in. But the pad control looks good, will be interesting to see if he has any crashes without the screen in the code.
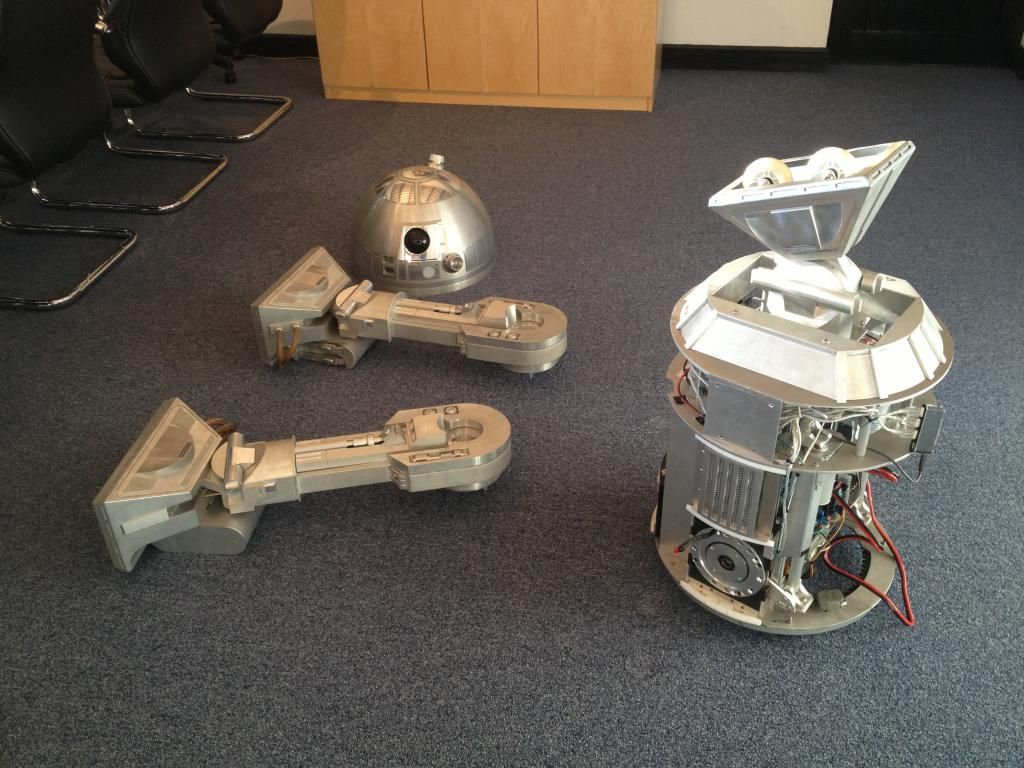
Will get some videos from the NEC on the weekend. But looks like he will have to travel in bits, no way i can lift it in and out of the car in 1 piece.
I wired the Sabretooth and Master Arduino flat instead of vertical, and added the slip ring connector to the back of the rig runner using a velcro pad. So its all in and looking like its going to work. :)

Then i added the 5V 12AH USB Powerbank to power the master, MP3 and 2-3-2 Arduinos. It worked great. So i added the other one in the dome to power the Teeces and the Dome servo Arduino (but not the servos). I hope this will add to the life of my droid significantly, its like adding 10Ah at 12v and should run that stuff for days at a time. 9 hours today in the dome running both and it still says full power. :) All that drive testing and 2-3-2 testing today all weekend and the main battery still says its full too! :D I might get a decent amount of driving in assuming it doesn't fail.


The rods studs make a big difference, and with a few tweaks it will be great. But it works fine for now, i will tweak and redo the actuator mounts after the NEC. Thanks again for those James, really cool. :)
So for the NEC we have the pad running this lot, i just need to learn the commands now. :)
1. Teeces triggered
2. Dome servos, 9 doors, 3 HPs
3. MP3 Control
4. Dome Drive
5. Dome Drive Position Controller
6. Feet Drive
7. 2-3-2 plus wobble and walk (no feet drive motion)

I have a plan to try and get the pad looked at soon, but i taped it up for now, it looks so much better, but still crashes, but nothing happened when the pad crashed, so that is good news. I think the next big priority is to adjust the drive settings when in 2 leg mode, he drives fine in 2 leg but i need to lower the acceleration and the top speed and help stop the desire to flip. But he seems relatively stable, he span on the spot ok and driving very gently it seemed fine.
So my droid was sorted pretty early today, but James was here so we had a look at getting his droid working via a pad, I will let him fill you in. But the pad control looks good, will be interesting to see if he has any crashes without the screen in the code.
Will get some videos from the NEC on the weekend. But looks like he will have to travel in bits, no way i can lift it in and out of the car in 1 piece.
Sunday, 11 November 2012
Battery Mount and Leg Rod Tweak
Slow going this weekend, more thinking than building. But got a bit done.
I started by adding restraining guides in the legs to help stop the leg rods from bending while driving, this should help lock the ankle a little better:

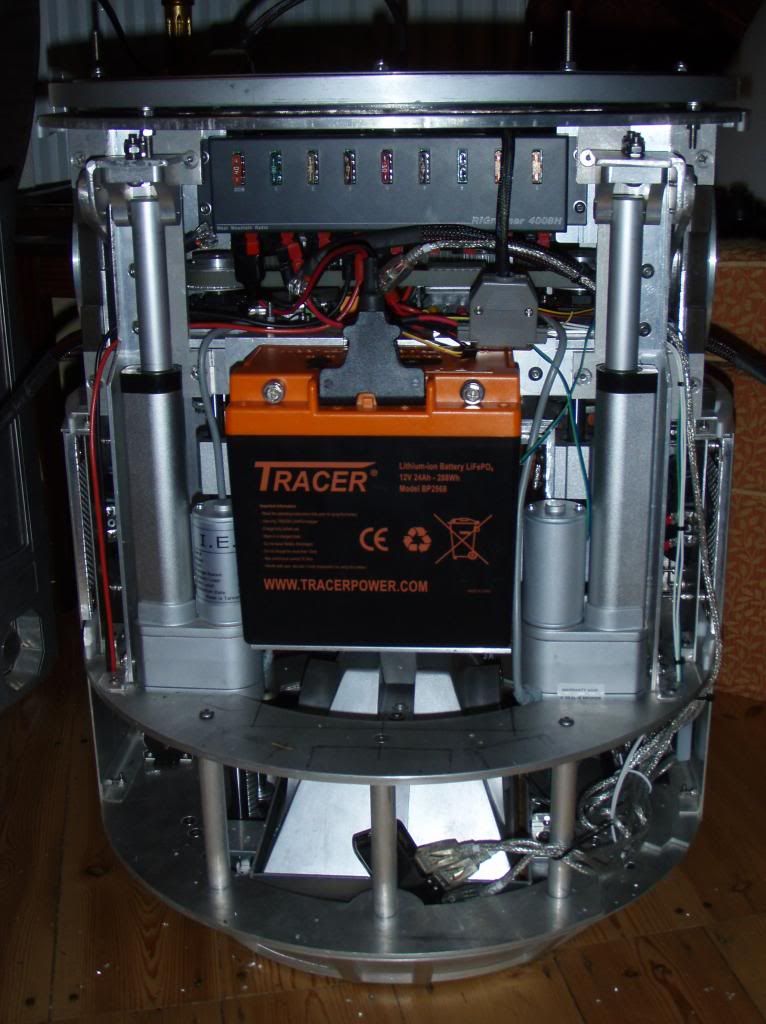
Then i went on to look at the battery and no matter how i approached it it just wouldn't work. So eventually i decided to make a platform for it to sit on, this would stop it from falling into the 2-3-2 space and also raise it enough to clear the cylinders and allow it to be mounted further into the body. This also allows the back door to remain unchanged. :)


Unfortunately this takes up all the space i had used for the electronics panel. So i have started to redo that, but typically not an easy job, the reduced height is now causing issues with the slip ring connector, so that is the next job to figure out.
But getting there, should be powered by the new battery for the next test. :)
I started by adding restraining guides in the legs to help stop the leg rods from bending while driving, this should help lock the ankle a little better:
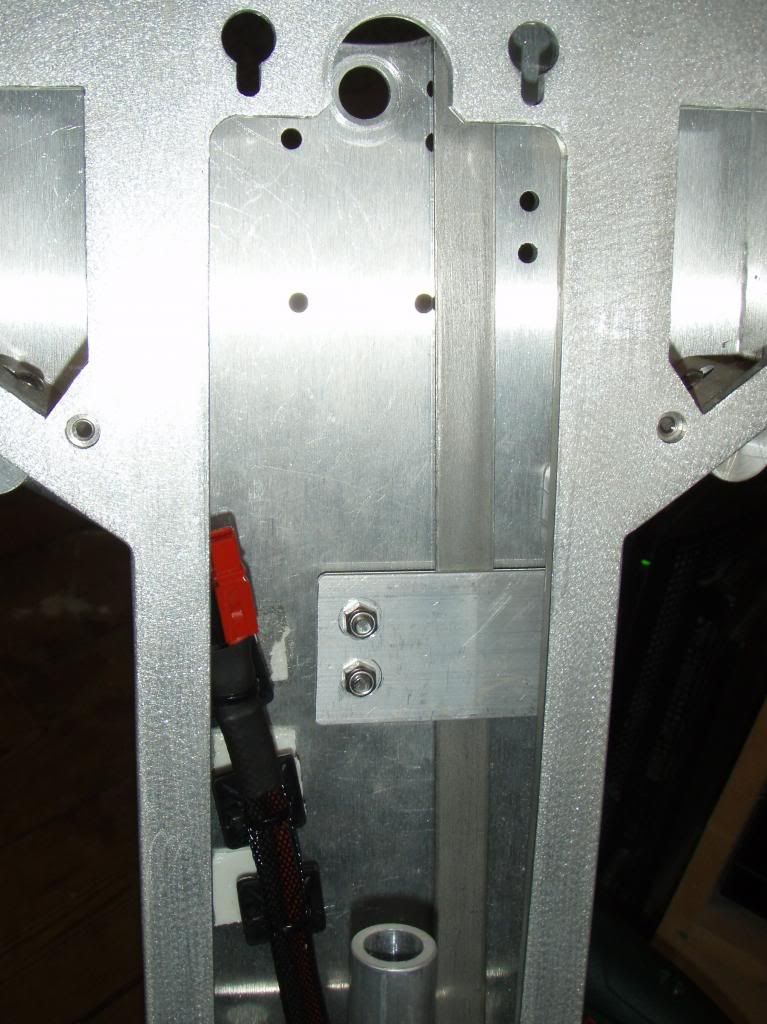
Then i went on to look at the battery and no matter how i approached it it just wouldn't work. So eventually i decided to make a platform for it to sit on, this would stop it from falling into the 2-3-2 space and also raise it enough to clear the cylinders and allow it to be mounted further into the body. This also allows the back door to remain unchanged. :)

But getting there, should be powered by the new battery for the next test. :)
Tuesday, 6 November 2012
2-3-2 Shoulder Studs
James has been on the case. I had used 10mm alu tube with a 7mm id tapped to fit an M8 bolt as the studs in the shoulders, but the thread wasn't great so kept coming lose, also finding the holes on the body was tricky. So the 4 studs ideally needed upgrading and luckily i know a man who can. :) I also wanted to add a threaded hole on the other end, i may be able to add a bolt through from the inside to lock it all tight for events, this and some straps in the legs will really help to stop the rods bending and allowing the foot angle to change on direction change. I think the current setup may not suit 2 leg driving. :)
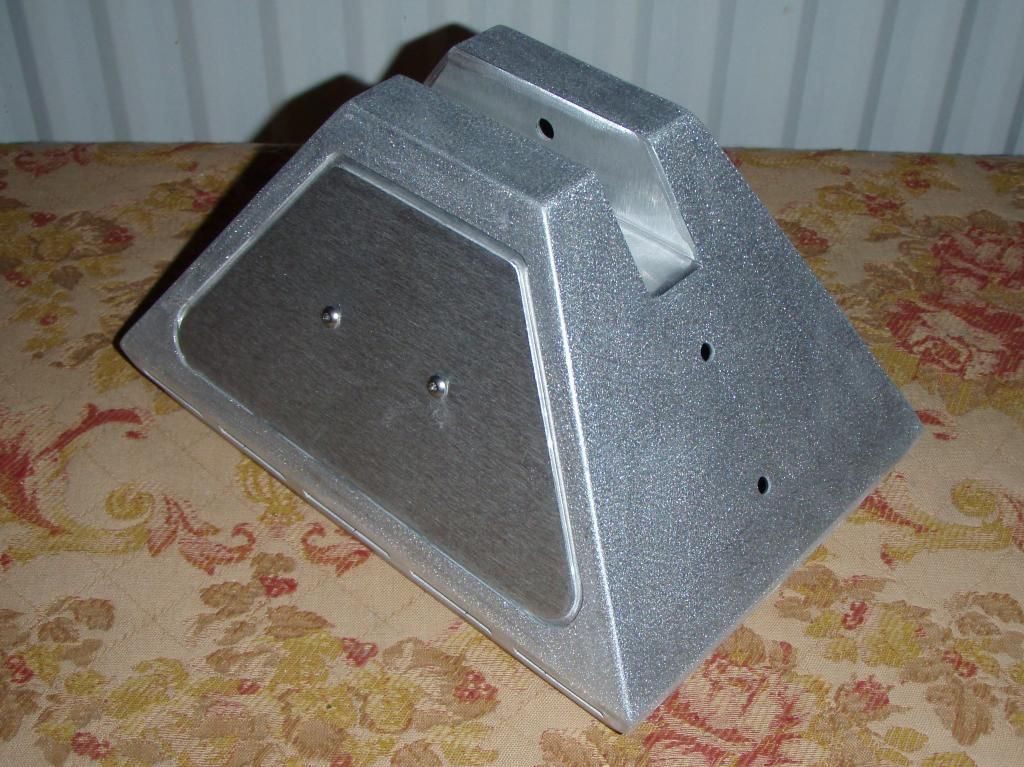
This is how they started:

This is the sketch:

And this is the first one: :)


This is how they started:

This is the sketch:

And this is the first one: :)


Awesome stuff dude, Gonna be really sweet. And the edges of my bit, it looks like a new piece! :)
Battery Arrived Today :)
It's great and fits where i had hoped. :) Will need to redo the back door to allow it to sit here, or raise it up and to clear the Ankle cylinders but that raises the weight, so back door it is. :)


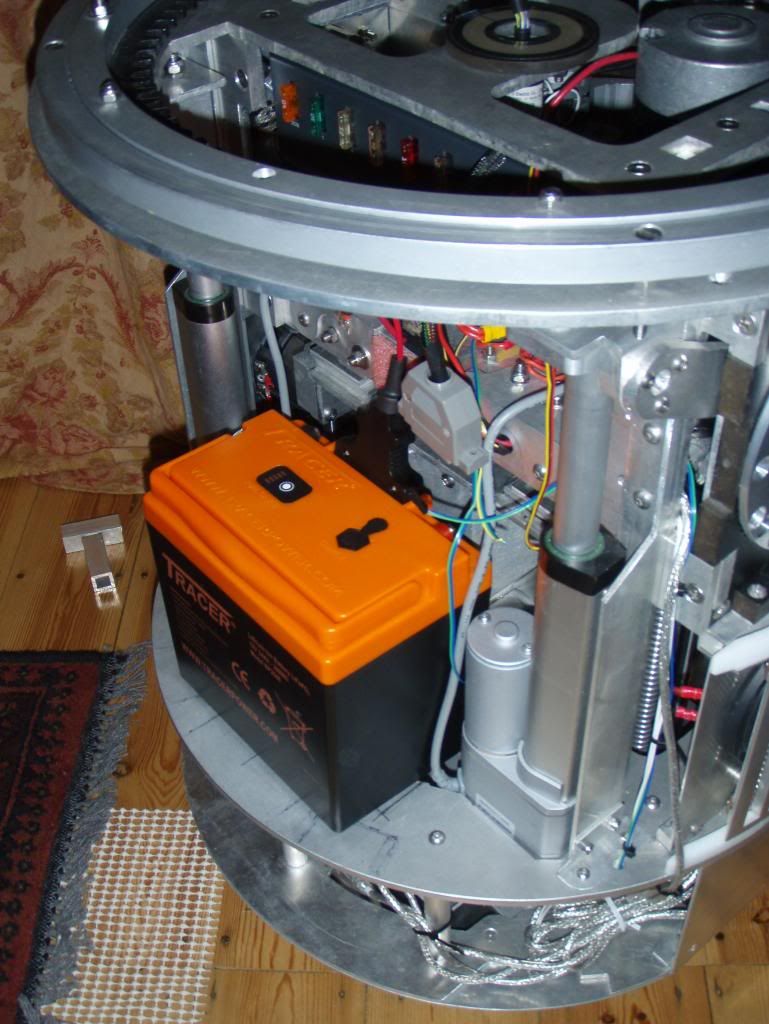
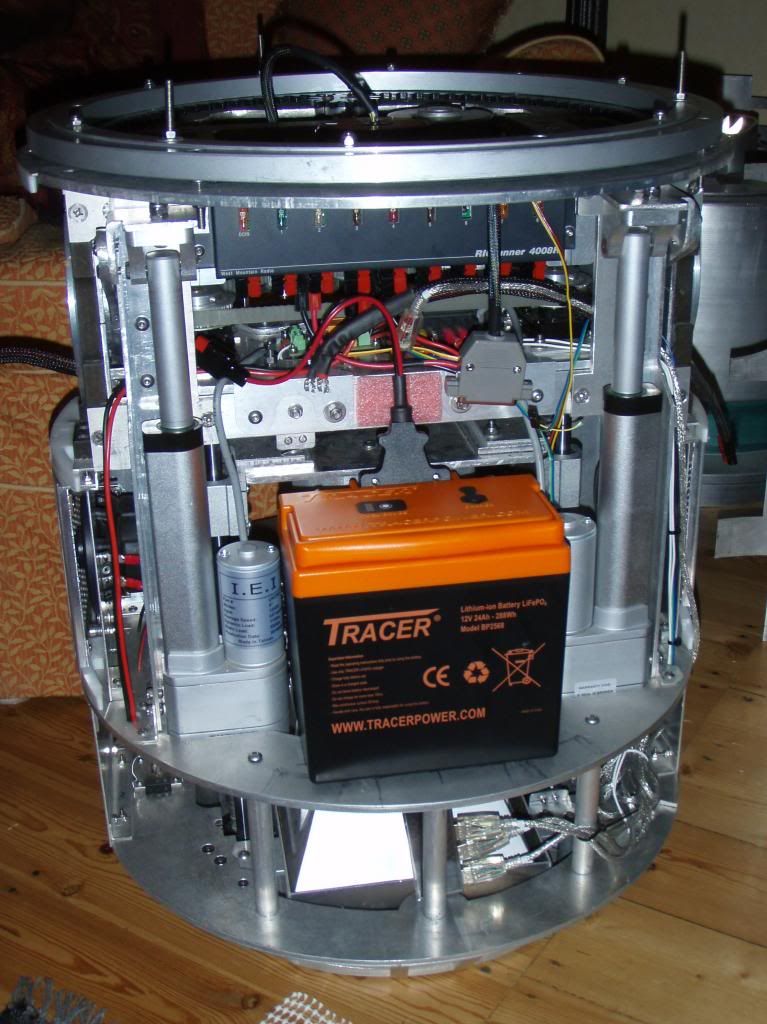
Only 2.9Kg for 24Ah. :) Awesome. Not that weight matters at this stage!
I think I will end up with 4 batteries eventually:
This bad boy to run the feet and dome drives, 2-3-2 motors, and power the servos.
2 x 12Ah 5v Powerbank USB supplies, one for the dome and one for the droid to power all the Arduino and the Teeces.
Finally I'd like to add a 10Ah 12v Lipo battery for the audio so that he can still do the lights and sounds when the main battery is dead, but that one can wait. :)
I am also intending to rig up the SLA batteries i have as a stand supply to save the driving charge. :)
Also James is on the case. Can you tell what it is yet?

Trick question really, it's the first custom stud, it's a part of the 2-3-2 shoulder mech, not a pet name for James. :) Thanks for doing these dude, will be much better, i have thought about how to improve those so many times. :)
Sunday, 4 November 2012
R2 Gets a Pressie
Having been such a good boy yesterday, i felt R2 deserved a reward. So i bought him this:
http://www.deben.com/golf-batteries/golf-36-hole-24ah-lifepo4-battery.html
Running him on a 7 Ah SLA was a little silly, only got about 30 mins out of it on carpet, and about 40 ish on the bricks, but they were quite bumpy. :)
Expensive, but looks like it will be worth it, Flip has one and it works great. Should fit, i hope. :) And should mean easier progress to thanks to a longer run time and faster charge. Also be nice to set-up the 2-3-2 with the battery on board to help with the balance.
Saturday, 3 November 2012
He Moves
Got to work early with James this morning and cleared the meetings room. :) Plan was to test inside on the carpet and then move into the courtyard if that went well.

So we connected the foot drives, all legs on, batteries charged and it was time to try driving. :)
I had the turn code right first off, so swapped that back, slowed the max speed and acc in fast mode to stop the wheelies giving me mini heart attacks, and it all worked like a charm. Worked fine on the carpet, spinning on the spot was no trouble, my 2 73 mm casters turn fine. And not sure if im happy or not but the flashing LED caster wheels in the centre didn't flash no matter how fast i went (they really were sold as plain, honest, i didn't want pimp my ride :) ).
Driving in 2 stick mode was tricky, i assumed that would be the most natural, but the 1 stick mode is great, and the fast or slow mode works great, slow is max speed of a medium pace walk and a slower acceleration and fast is almost flat out, i trimmed it in a bit, i think that will help extend the batteries a little.
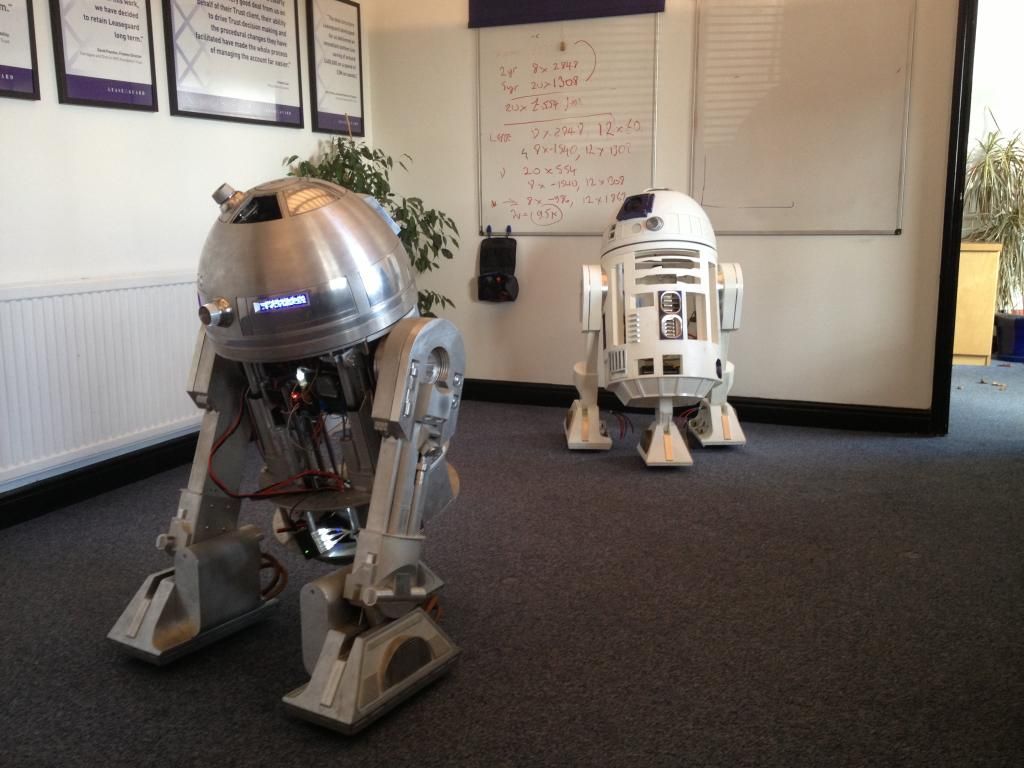
Then tried the other stuff, and a dead wire to the dome drive stopped that working on the new wire up, and the I2C line into the dome needed swapping, but other than that it all worked as expected. So we took it outside and took some proof. :) It really was an awesome day, and i am so pleased with the way it works, need a few more miles testing, but great so far, and its so quiet, the chains are not as bad as i had thought they would be.
We also got James' R2 hooked up and all the drive and electronics worked great, but i will let him update you on that one.

James has offered to redo the studs that keep going lose on the 2-3-2 shoulders, they will be much better once redone, and will stay locked up tight, can also lock them in from inside the droid then too.
The other issues i spotted are that the Actuator brackets need to be a better fit, if i were to try driving in 2 leg mode as it is, it wouldn't be great, it will also really help with the wobble and walk options, James might help me with that too. :D Also the outer feet have more ability to change angle than id like, i think some of this will be cured by the new studs, but also i think i will brace the control rods into the legs to minimise the flex.
So after all that progress he is in bits again already, but not long till NEC, so need to crack on. I hope to be able to get the body only 2-3-2 testing and LCD screen swap needed next, then get the bits back and test the full 2-3-2 for then, so lots to be doing. :) Also need to help James to get his pad set-up working and get control of the MP3s, Lights etc.
So we connected the foot drives, all legs on, batteries charged and it was time to try driving. :)
I had the turn code right first off, so swapped that back, slowed the max speed and acc in fast mode to stop the wheelies giving me mini heart attacks, and it all worked like a charm. Worked fine on the carpet, spinning on the spot was no trouble, my 2 73 mm casters turn fine. And not sure if im happy or not but the flashing LED caster wheels in the centre didn't flash no matter how fast i went (they really were sold as plain, honest, i didn't want pimp my ride :) ).
Driving in 2 stick mode was tricky, i assumed that would be the most natural, but the 1 stick mode is great, and the fast or slow mode works great, slow is max speed of a medium pace walk and a slower acceleration and fast is almost flat out, i trimmed it in a bit, i think that will help extend the batteries a little.
Then tried the other stuff, and a dead wire to the dome drive stopped that working on the new wire up, and the I2C line into the dome needed swapping, but other than that it all worked as expected. So we took it outside and took some proof. :) It really was an awesome day, and i am so pleased with the way it works, need a few more miles testing, but great so far, and its so quiet, the chains are not as bad as i had thought they would be.
We also got James' R2 hooked up and all the drive and electronics worked great, but i will let him update you on that one.
James has offered to redo the studs that keep going lose on the 2-3-2 shoulders, they will be much better once redone, and will stay locked up tight, can also lock them in from inside the droid then too.
The other issues i spotted are that the Actuator brackets need to be a better fit, if i were to try driving in 2 leg mode as it is, it wouldn't be great, it will also really help with the wobble and walk options, James might help me with that too. :D Also the outer feet have more ability to change angle than id like, i think some of this will be cured by the new studs, but also i think i will brace the control rods into the legs to minimise the flex.
So after all that progress he is in bits again already, but not long till NEC, so need to crack on. I hope to be able to get the body only 2-3-2 testing and LCD screen swap needed next, then get the bits back and test the full 2-3-2 for then, so lots to be doing. :) Also need to help James to get his pad set-up working and get control of the MP3s, Lights etc.
Friday, 2 November 2012
Final Prep
In readiness for R2 to take his first steps tomorrow, on Tuesday i finally hooked up the chains from the motors to the wheels and powered up the Sabertooth. The drive trains ran fine, but it did not go well :(
Problems:
1. When it got to top speed one motor would freeze, but only at top speed and only on one motor, when i swapped the supplies it did the same, so it wasn't in the code. Only by trimming the speed down from 180 to 165 and 0 to 30 did it work reliably.
2. There was a popping being heard on the audio, not good. Only occasionally but mainly on direction or speed change.
3. A couple of times its default speed was different so the motors would run slowly, this was not right, wasn't sure why and couldn't recreate it.
So had a bit of a play, tried different dip setting and tweaked the code here and there and still nothing reliable. So contacted Dimension who suggested i send it back to be repaired. Great customer service.
Wanting it running for the big test tomorrow and for the NEC on the 17th, I ordered another Sabertooth. That arrived today.
Then i get back tonight, rewire a few things to make sure all the connections are clean etc. Reread the manual for the Sabertooth one last time and set it up how i assume it should be and give the old one one last try. Annoyingly, now i have a 2nd one, the first one works beautifully. I don't know if switching all the dips back and forth helped or if I hadn't found the magic combo before but it seems to be perfect now, full speed is no problem and it seems smooth, and no noise on the speakers either. Might just have needed the freshly charged 12v battery. :) I did think it was odd, all the testing with it had gone beautifully.
I'm going to keep an eye on it and see if the problems come back, but looks like i might be able to return the 2nd one. :) But the 2nd one is a V2 so might do the ramping, then i could use the serial connection and the on-board mixing, the V1 wouldn't do the ramping, but the V2 might. Decisions decisions. :)
The magic combo on the dip switches was 1, 4 and 6 down and the rest up. I think the main one was number 6, that was the auto cut off and auto trim, it did mean moving the stop point in the code to 96 degrees but works great now. I haven't had any of the original problems since.
I tweaked the speed of the slow mode and the acceleration based on what looks right from the speed of the wheels, but i may well be well off on that, then swapped the turn in the code to help turn in the right direction, i hope i got that right, its pretty confusing :) So i reckon we might be ready to test the real driving tomorrow. I quite fancy trying the 2-3-2 code tonight too. I'm feeling brave after that success.
He doesn't look too dignified at the moment. :)

Sunday, 28 October 2012
Wiring UP 2-3-2 and Drive System
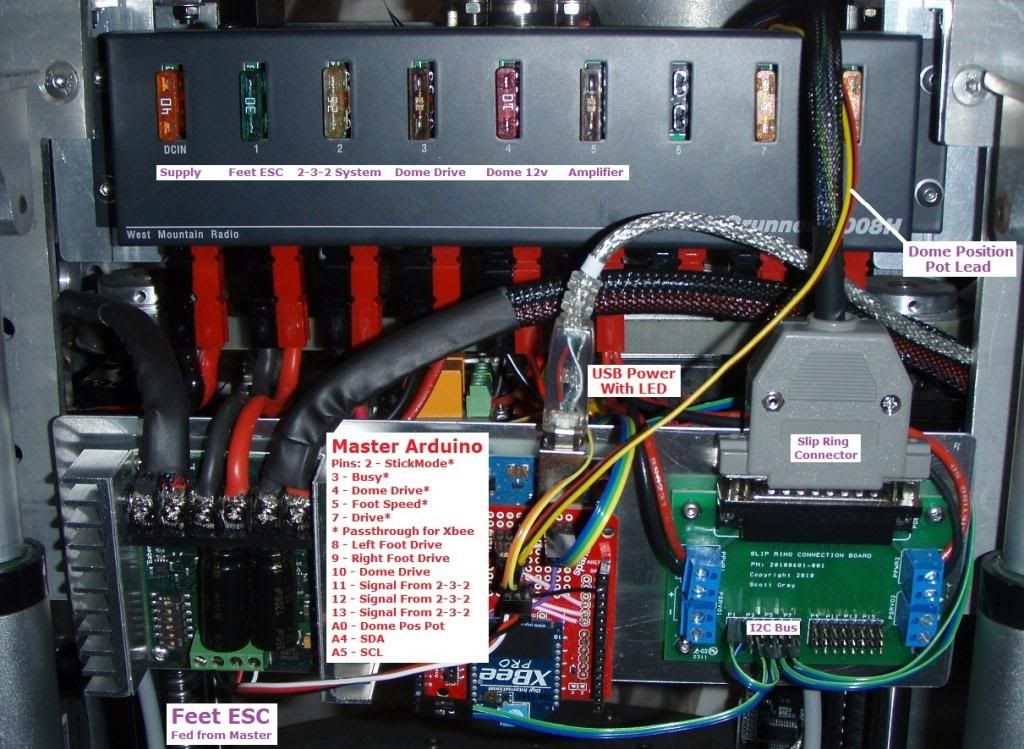
After a few days ill in bed, I was really looking forward to getting a bit done once it cleared. So yesterday I finished off the wiring for all the elements I have fitted but haven't yet sorted. I then redid the custom shields as needed for the 2-3-2 and Master Arduino.
I found that the frame upside down on the Rockler made a superb working area, I could spin the whole body to access the right bit. :)
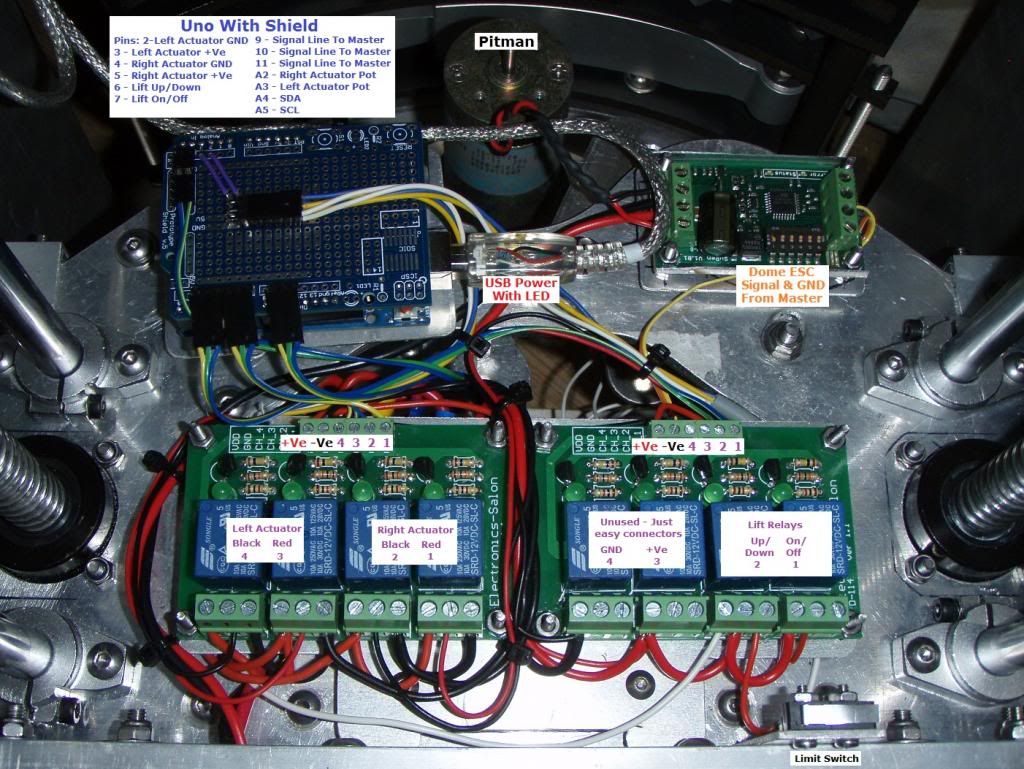
I finished fitting the Feet and Dome Speed controllers and sorted all the wiring. I have rewired the 2-3-2 system and added a new shield to help simplify the layout. I also wired in the Master Arduino and all the connecting wires.


But while rewiring the 2-3-2 I realized I had disconnected it all without having documented the set-up. So I now have the fun task of remapping all the pins in the code and making sure all the motors are driven in the right directions. :) But I thought that for next time a bit more documenting of the set-up would be good. So here we go:


So once this lot is fully tested he will be doing the 2-3-2 and driving via the pad. But lots of work to do before that. But another step forward.
I still need to finish wiring up the 5v USB power supplies. The hope is that running all the 5v low current stuff from USB Powerbanks will maximise the run time of the 12v supply.
Aiming to have it all working for the NEC, I would like to have the pad redone to use the other LCD too. But driving and 2-3-2 is the main concern at the moment.
Just a shame it will only work for as long as the 7Ah SLA battery lasts. But I cant justify the decent battery at the moment. Will have to locate a 2nd SLA for the event.
I found that the frame upside down on the Rockler made a superb working area, I could spin the whole body to access the right bit. :)
I finished fitting the Feet and Dome Speed controllers and sorted all the wiring. I have rewired the 2-3-2 system and added a new shield to help simplify the layout. I also wired in the Master Arduino and all the connecting wires.


So once this lot is fully tested he will be doing the 2-3-2 and driving via the pad. But lots of work to do before that. But another step forward.
I still need to finish wiring up the 5v USB power supplies. The hope is that running all the 5v low current stuff from USB Powerbanks will maximise the run time of the 12v supply.
Aiming to have it all working for the NEC, I would like to have the pad redone to use the other LCD too. But driving and 2-3-2 is the main concern at the moment.
Just a shame it will only work for as long as the 7Ah SLA battery lasts. But I cant justify the decent battery at the moment. Will have to locate a 2nd SLA for the event.
Saturday, 20 October 2012
JAG Alu Centre Foot
This arrived too, the JAG Alu Centre foot. Forgot to post it. :) It is really beautiful. I'm going to wait to fit it, it might be in for CE2, but will test the current set-up to start. Id love a set of alu outers too, but don't think they are very likely. I just hope the thicker alu doesn't cause too many issues with my custom caster set-up, it's pretty tight on the steel one.

BHD 1.6 Teeces Code and Code URL
I finally got round to cleaning up the 1.6 code I used in the Dome light kit. I fixed a few bugs and tweaked it here and there, so thought it worth uploading the finished code and making it available in a location that the latest could always be found. I am sure it will keep getting tweaks. I included 3 examples;
1. Simple Random logics PSIs and no HPs. Similar to the default code.
2. All the script options in the loop as demo. Similar to the video for 1.4.
3. The last used version of my I2C control to better see how I triggered it to control all the HPs, PSIs and Logics.
I hope it should make it easier to figure out how it works, but I may need to go back and annotate it a little better.
I also collected up all the sketches I have got working so far for the Ard2-P2 controller and droid Arduinos, all libraries used and the XBee files. All the Arduino use I2C in 1 direction to talk from master to end units. There are 6 Arduino in the set-up so far:
1. Pad end. Currently a Nano, but due to become a mini mega. Plus PS2 pad, Screen and Xbee.
2. Droid master end. Currently a mega but will swap to an Uno plus XBee Shield. Connects to Siren 10 and Sabertooth 2x25.
3. MP3 Uno and Sparkfun MP3 shield.
4. 2-3-2 Uno. Connects to actuator pots and relays for 2-3-2 setup.
5. Dome Servo Uno. Connects to the signal lines of 12 servos
6. Teeces Pro Micro. All dome lights.
These are all pretty rough, not much annotation and what is there may be wrong. But it all works, except the 2-3-2 code, that is yet to be tested. But all WIP so may not be how it all works in the final incarnation, but will try and keep all major updates in new files in there from now on. Will also start uploading things like the test sketch i used for the dome sensor. Could be really useful for someone, and easier to follow than hidden in the main file.
All the files are here:
Google Drive Folder
I have only been playing with the Arduino stuff for about 6 months or so, and hadn't coded at all for more than a decade, so this may not be done in the textbook manor, but it all works. :) And so far works well.
The standard LCD arrived, so will have to try and get that up and running soon. Fingers crossed on that one. Also started wiring the feet motors from the legs into the body. Exciting times. Just making a mount plate for the ESC, Master Arduino and the Slip Ring board and he will be almost ready to roll.
Wednesday, 17 October 2012
Monday, 15 October 2012
Dome drive is done.
Dome drive is done. :) In the 1 stick mode the right stick drives the dome and then R1+R2 triggers and a face button allow dome drive scripts to be run, during which the dome drive via stick is disabled So I have face forward, left, right and back, spin left, spin right, small shake, big shake, double spin, spin then spin back. All possible. Will write something into the Cantina script, maybe a slow spin on the short-circuit too.
I cant stop playing with the dome drive, great fun via stick and buttons, the more stuff moves the more I'm enjoying this building lark. :)
Hope to have a video for you Wednesday.
So next up is to repair the I2C lines I used in the dome, they were lose in the dome and got mangled, so need to test them and repair the dead ones. :)
Then its 2-3-2 time once more, but this time via remote. :)
Sunday, 14 October 2012
Pad Crash Protection and Basic Dome Position Control
Well, a lot more pottering than solid building this weekend, but got a few useful bits done.
I have redone the code to reset the dome and feet drives if the serial on the droid end doesn't receive an update for 20 attempts in a row, should be about 0.4s, works fine. Also ordered an LCD without the I2C (was only £8), it will use more pins but should work and might not have the same issue. Either way I have pad end Arduino crash protection now. :)
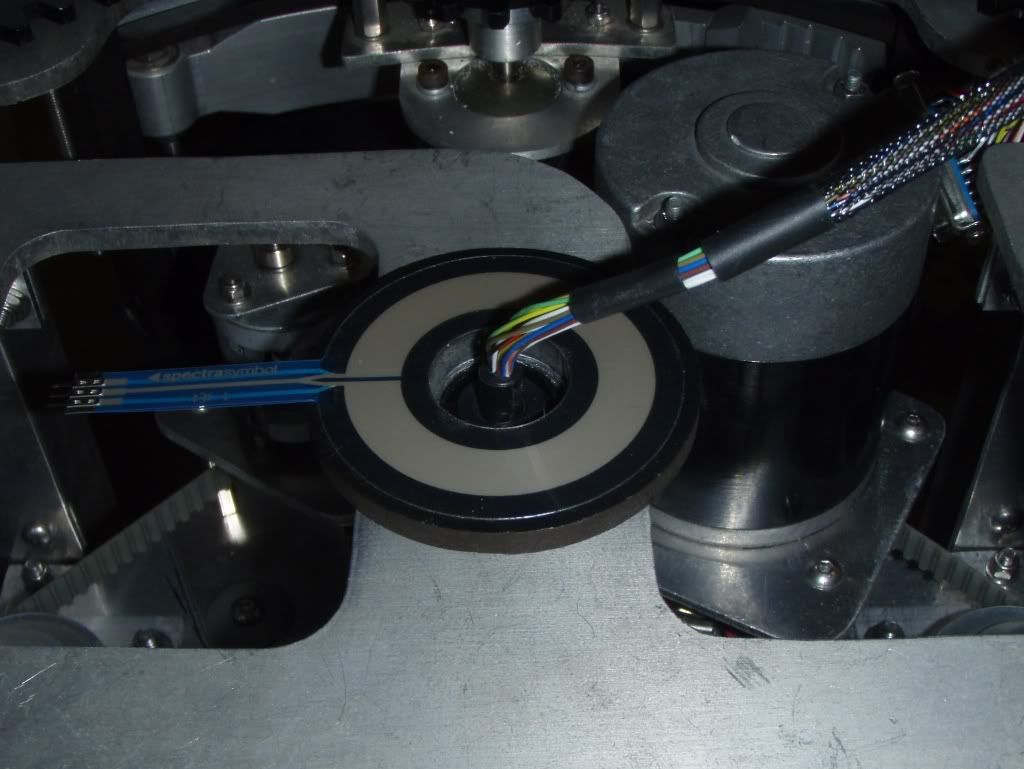
So with that done i went back to the dome drive and the position control. For the position I am using one of these:
https://www.sparkfun.com/products/8678
With a wiper attached to the dome baseplate (old pics):


For the drive I am using the A&A dome gear and a Pitman controlled by a Syren 10 connected to the droid maser Arduino as a servo. I tried the serial control of the Syren, but couldn't control the ramping so ditched it for the VarSpeedServo library and I use the "slowmove" option.
The old code I had used microseconds, I have been finding degrees easier to work with, especially as this is speed so the accuracy doesn't matter too much. So I scrapped all that and I rewrote the code to sense the position and then depending on distance apply a speed to the dome and keep doing so until position is reached, I added 4 ranges to apply different speeds at different spots to bring it to a smooth stop and not shoot off if close already. Then added a variable buffer value that allows me to change the accuracy so that head shakes etc aren't fussy about the exact spot so just change direction and don't seek the spot. The VarSpeedServo really helped to smooth it all. There is no clunking and it changes direction really smoothly. Much better than the clunky mess i had with the standard servo library set-up.
I can spin the dome, or face in any direction quite happily now via script, so next job is to add it all to the main Droid Arduino and get it under pad control, both via the stick and via buttons to face forward or spin or shake or whatever. Going really well. Will need my cameraman soon for another video. :)
I have redone the code to reset the dome and feet drives if the serial on the droid end doesn't receive an update for 20 attempts in a row, should be about 0.4s, works fine. Also ordered an LCD without the I2C (was only £8), it will use more pins but should work and might not have the same issue. Either way I have pad end Arduino crash protection now. :)
So with that done i went back to the dome drive and the position control. For the position I am using one of these:
https://www.sparkfun.com/products/8678
With a wiper attached to the dome baseplate (old pics):

For the drive I am using the A&A dome gear and a Pitman controlled by a Syren 10 connected to the droid maser Arduino as a servo. I tried the serial control of the Syren, but couldn't control the ramping so ditched it for the VarSpeedServo library and I use the "slowmove" option.
The old code I had used microseconds, I have been finding degrees easier to work with, especially as this is speed so the accuracy doesn't matter too much. So I scrapped all that and I rewrote the code to sense the position and then depending on distance apply a speed to the dome and keep doing so until position is reached, I added 4 ranges to apply different speeds at different spots to bring it to a smooth stop and not shoot off if close already. Then added a variable buffer value that allows me to change the accuracy so that head shakes etc aren't fussy about the exact spot so just change direction and don't seek the spot. The VarSpeedServo really helped to smooth it all. There is no clunking and it changes direction really smoothly. Much better than the clunky mess i had with the standard servo library set-up.
I can spin the dome, or face in any direction quite happily now via script, so next job is to add it all to the main Droid Arduino and get it under pad control, both via the stick and via buttons to face forward or spin or shake or whatever. Going really well. Will need my cameraman soon for another video. :)
Friday, 12 October 2012
Pad Freezing Issues
I have a problem with the I2C Screen freezing. It locks up the Arduino and stops the pad working. I can recreate it and if i do random commands to start it can work perfectly for hours. It's very odd.
I think I must have tried a dozen or so libraries for the I2C display on the pad, and those that do display the text correctly have the same or worse issues. Many simply didn't work at all, some required rebuilding the code, then didn't work. So I'm pretty sure I have the best library for the job, but I don't have the skills to rebuild the library or to diagnose the issue any further. It's so close to being perfect it makes it even more frustrating. If you do random combos for the first half a dozen commands it then will allow any combo to be used and works flawlessly. Its driving me mad!
I have rewritten the pad code a couple of times and managed to get the problems to change slightly, but nothing seems to solve it. So I am convinced the code is fine and the library is to blame. But I could still be wrong. I had pinned my hopes on the Nano being the issue, but I swapped it for a mega tonight, and that has exactly the same problem, so it isn't RAM related, or related to the Arduino type. :(
The issue is either in the Wire or LiquidCrystal_I2C libraries, but the Arduino site link is dead for the latest library.
If I short the 2 I2C lines it causes exactly the same issue.
The good news is that it only freezes when the screen changes, so driving isn't an issue, only running the button presses. But as I want to be able to run scripts while driving I need to find a way round it.
So I have decided to take a different approach. I am going to persist with the current code, but add a button to reset the pad, and also add some code to the droid to stop it if it loses connection. This combined with a shorter setup on the pad should mean its usable, and allow a little more faith that it wont run off and destroy stuff. :)
But I will keep an eye out for updated libraries and see if I can solve it further down the line, and maybe look at alternative screen options and see if they are any better. Its really disappointing, it's so close to an ideal solution.
So a very frustrating couple of evenings work, loads of effort and zero progress. :(
Thursday, 11 October 2012
11/10/12 R2 Progress update
Well boys and girls, time has come to start a blog. The build log on astromech.info was fine, but with a small member base it wasn't getting that many views, and for the effort it took it felt like it wasn't worth doing. But i enjoyed writing it, and looking back at what had been done, so a blog that can be read by anyone has to be a better option. :) I hope you enjoy it.
I wont redo all of the progress to this point, but if you spot a job and want to know more about it, ask me and i will grab that element from the old build log and repost it here. But for all the work up to this point the photos and videos are here:
The dome is built, the 2-3-2 is in and working, and the feet drives are fitted. But nothing as yet has been final fitted. I wanted to get the control sorted before finishing anything. Here is a video of the 2-3-2 elements and the dome servos running from a button pad in the back of the droid.
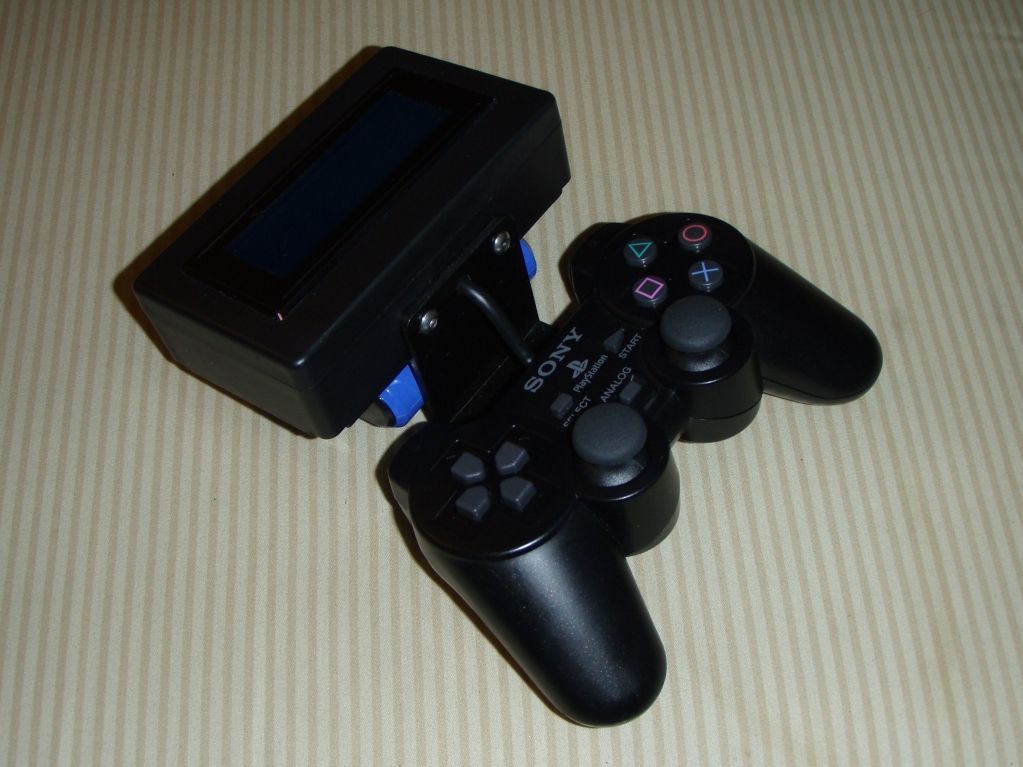
I am currently working on the electronics and control. The setup is all based around Arduino microprocessors. I am using a PS2 controller, connected to an Arduino and an I2C 4x20 LCD screen, that then uses an Xbee to wirelessly connect to an Xbee and Arduino in the droid.

The Xbees are setup to pass the pad stick values and a script number from the pad to the droid, and to pass 5 digital IO lines from the droid to the pad. The IO lines are used to read the states of the feet drives etc and there is also a 'busy' line.
There seems to be an issue with the I2C display library, it causes the screen and pad to crash but only after the first 4 press combos, and only if certain combos are used, very strange. I have found a new library that may solve the issues, but need to rebuild the code to be able to use it.
The Droid master uses I2C to communicate with 'End Unit' Arduinos. So far i have control of the MP3s, Dome servos (9 doors and 3 Hps) and the Teeces v3 light kit running my custom code. Here is the latest video of all the elements running together.
Next jobs will be to sort the Pad and make it as reliable as possible, Dome drive position control and then 2-3-2 and feet drive control.
More updates soon.
I wont redo all of the progress to this point, but if you spot a job and want to know more about it, ask me and i will grab that element from the old build log and repost it here. But for all the work up to this point the photos and videos are here:
The dome is built, the 2-3-2 is in and working, and the feet drives are fitted. But nothing as yet has been final fitted. I wanted to get the control sorted before finishing anything. Here is a video of the 2-3-2 elements and the dome servos running from a button pad in the back of the droid.
I am currently working on the electronics and control. The setup is all based around Arduino microprocessors. I am using a PS2 controller, connected to an Arduino and an I2C 4x20 LCD screen, that then uses an Xbee to wirelessly connect to an Xbee and Arduino in the droid.
The Xbees are setup to pass the pad stick values and a script number from the pad to the droid, and to pass 5 digital IO lines from the droid to the pad. The IO lines are used to read the states of the feet drives etc and there is also a 'busy' line.
There seems to be an issue with the I2C display library, it causes the screen and pad to crash but only after the first 4 press combos, and only if certain combos are used, very strange. I have found a new library that may solve the issues, but need to rebuild the code to be able to use it.
The Droid master uses I2C to communicate with 'End Unit' Arduinos. So far i have control of the MP3s, Dome servos (9 doors and 3 Hps) and the Teeces v3 light kit running my custom code. Here is the latest video of all the elements running together.
Next jobs will be to sort the Pad and make it as reliable as possible, Dome drive position control and then 2-3-2 and feet drive control.
More updates soon.
Subscribe to:
Posts (Atom)